Contents

1. how to change text of portfolio info's attributes like "clients, skills, website...." ?

2. Unauthorized Use of Marriott Marks

3. How To Hide Player Status tab on single player page

4. Font Support Cyrillic - Modernize

5. Slider Activation Warning

6. Bad Authentication Data / Using twitter widget

7. Revolution Slider Activation Problem

8. How to Link donate now button with other page than donation form ?

9. Word cutting in middle on blog page

10. Change order of personnel posts

11. Exclude GoodLayers' GDPR Cookie from caching

12. Can't upload logo

13. Having problem with one click theme update(Envato Market Plugin)

14. Updating Layer Slider - Tourpackage since v2.00

15. Max Mega Menu Integration

16. Updating Revolution Slider

17. Bad Authentication Data / Using twitter widget - Grand College

18. Revoking the licenses

19. How to Change Portfolio title to link to specific URL , just same as Thumbnail image ?

20. Updating Good LMS

21. Making your site faster with WP Fastest Cache and Autoptimize

22. Page Builder/Page Editor Broken

23. Modifying the enquiry form

24. How to choose a unique title background image for each page ?

25. How to get instagram Access Token

26. Can not see theme in the list when submitting new ticket?

27. Blog Widget Equal Height - Modernize

28. Updating Layer Slider

29. Can't import demo content

30. How To Update GoodLayers Plugins? (since Flawless Theme)

31. Making your site faster with W3 Total Cache plugin

32. Updating Tour Master

33. Add comment to course page.

34. Fixing / Using Twitter Widget - (Themes before Modernize)

35. To Update Theme

36. Adding Instagram icon in the header (Themes in second framework version.)

37. Security Concern

38. Full Width Logo in in V3.0+ - Modernize

39. Creating Child Theme

40. Adding social shares in pages - Modernize

41. Creating Woocommerce Template For WooCommerce's Sidebar

42. Larger Lightbox(PrettyPhoto) in mobile/tablet

43. Where can I get my purchase code?

44. How to change the donation values in Donate Now popup box?

45. Updating Master Slider

46. How to upload the theme via FTP method

47. How can I change the font size on the menu ?

48. TourPackage Theme - Creating 'Boxed Layout'!

49. Translating the theme/plugin using poedit application

50. How to change currency in donation box ?

51. where i change the value of points compiled for a win for the league table ?

52. Updating POT file

53. Server Configuration Requirements

1. how to change text of portfolio info's attributes like "clients, skills, website...." ?

Hi There ,

edit this file : /wp-content/plugins/gdlr-portfolio/gdlr-portfolio-item.php:

line#  194: 	$ret .= '' . __('Client', 'gdlr-portfolio') . ' ';
line#  203: 	$ret .= '' . __('Skills', 'gdlr-portfolio') . ' ';
line#  212: 	$ret .= '' . __('Website', 'gdlr-portfolio') . ' ';
line#  222: 	$ret .= '' . __('Tags', 'gdlr-portfolio') . ' ';

in above change text in __('Client , do same for other attributes and save file .

2. Unauthorized Use of Marriott Marks

Dear all customers,

If you're currently Hotel Master's customer, please read this article carefully.

If you previously imported the demo content of this theme, make sure that when you're launching your website, you must remove the Award Logos in the 3rd footer because one of them is a Marriott Marks which can be unauthorized used if your hotel is not authorized by Marriott chain.

To remove it, 

1. Simply go to 'Appearance > Widget' 

2. In 'Footer 3', remove the image code here: http://take.ms/I1X0G

 , or you may change to other image instead. 

Thank you!

3. How To Hide Player Status tab on single player page

to hide player status : replace your single-player.php file with this one => http://cl.ly/YtHX/download/single-player.php

path of that file is : /wp-content/plugins/goodlayers-soccer/single-player.php:

Cheers !

4. Font Support Cyrillic - Modernize

To change the google font subset, try going to

include/plugin/fontloader.php file.

Around line 219, you'll see

	// include all used font into the website
	add_action('init', 'include_used_font');
	function include_used_font(){
		if(is_admin()) return;
		
		global $all_font;
		$google_font_family = '';
		
		foreach($all_font as $font_name => $font){
		
			if($font['is-used']){
			
				if($font['type'] == 'Cufon'){
				
					wp_deregister_script($font_name);
					if( $font_name == 'Cufon'){
						wp_register_script($font_name, $font['path'], false, '1.0', false);
					}else{
						wp_register_script($font_name, $font['path'], false, '1.0', true);
					}
					wp_enqueue_script($font_name);
					
				}else if($font['type'] == 'Google Font'){
				
					$google_font_family = $google_font_family . str_replace(' ', '+' , $font_name) . ':subset=latin:n,i,b,bi|';
					
				}			
				
			}
			
		}
		
		if(!empty($google_font_family)){
			wp_enqueue_style('Google-Font','http://fonts.googleapis.com/css?family=' . $google_font_family);
		}
	
	}

Try to change to

// include all used font into the website
	add_action('init', 'include_used_font');
	function include_used_font(){
		if(is_admin()) return;
		
		global $all_font;
		$google_font_family = '';
		
		foreach($all_font as $font_name => $font){
		
			if($font['is-used']){
			
				if($font['type'] == 'Cufon'){
				
					wp_deregister_script($font_name);
					if( $font_name == 'Cufon'){
						wp_register_script($font_name, $font['path'], false, '1.0', false);
					}else{
						wp_register_script($font_name, $font['path'], false, '1.0', true);
					}
					wp_enqueue_script($font_name);
					
				}else if($font['type'] == 'Google Font'){
				
					$temp_font_name = str_replace(' ', '+' , $font_name);
					$google_font_family = $temp_font_name . ':300,300italic,400,400italic,700,700italic&subset=latin';
					wp_enqueue_style('Google-Font-' . $temp_font_name,'http://fonts.googleapis.com/css?family=' . $google_font_family);
				
				}				
			}
		}
	
	}

This is an example of the font subset

latin,cyrillic,greek,vietnamese,greek-ext,cyrillic-ext,latin-ext

5. Slider Activation Warning

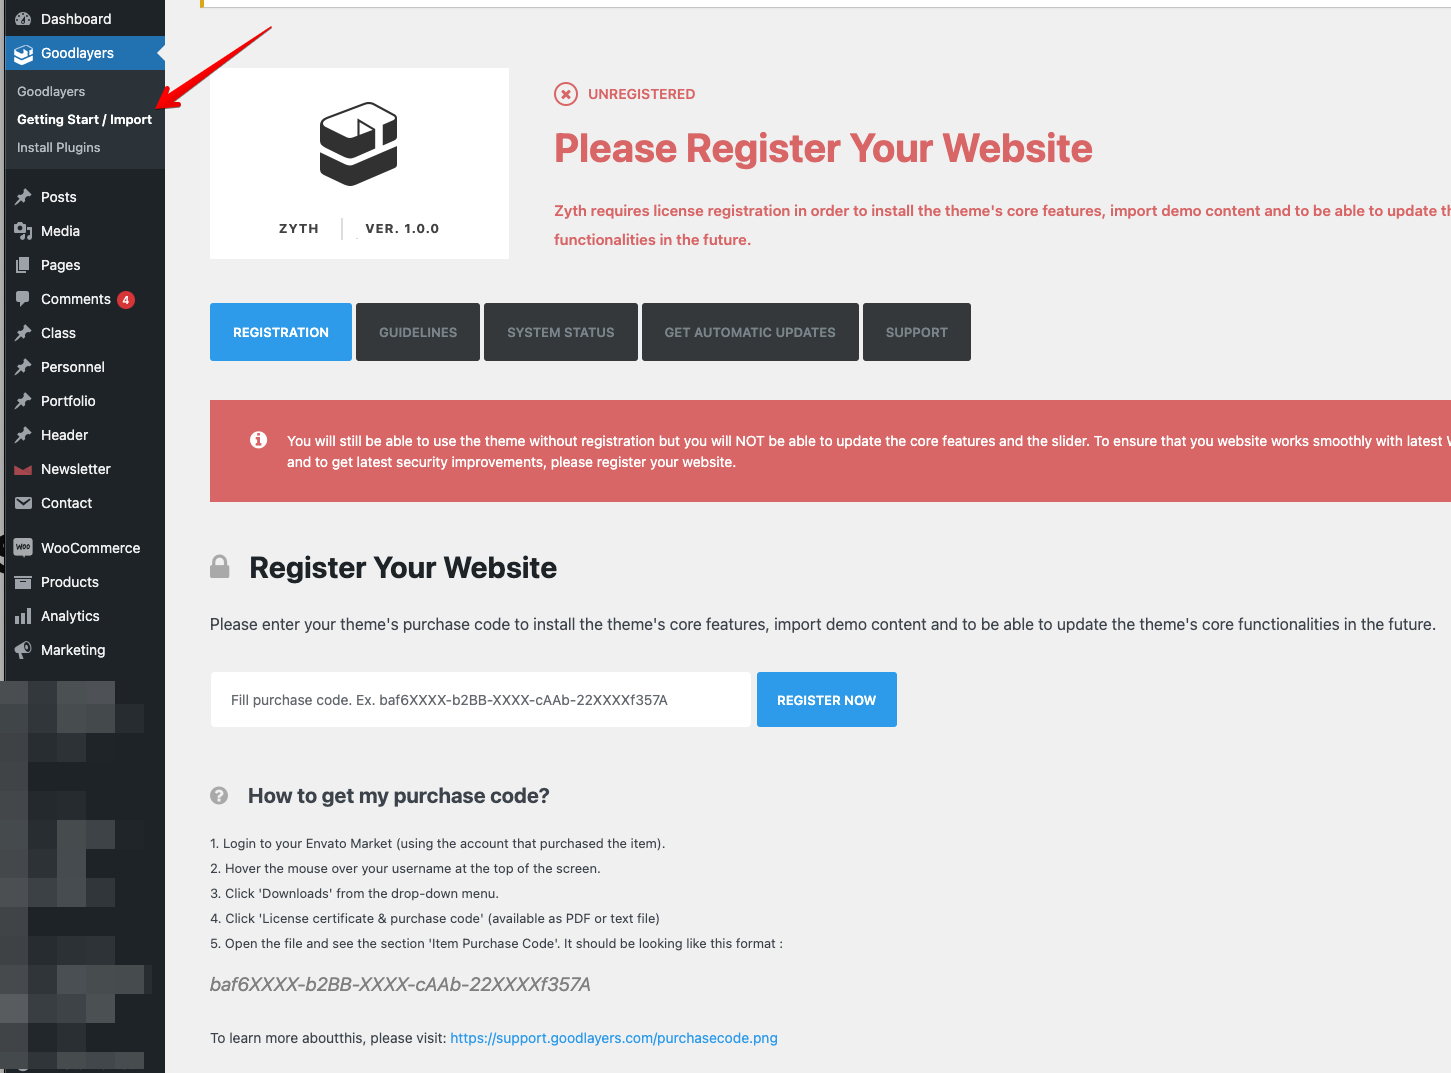
After you installed the theme and slider plugin properly, you may still see the warning like these...

For Revolution Slider, it looks like this : 


For Layer Slider, will look like this : 


Please note that you can't put the theme's purchase code in that field. It will not work.

The purchase code( or activation code) for slider is not necessary. It's used for auto updater for the slider. However, the slider that's included in this theme is being used as 'Extended license', it's considered as a bonus file which doesn't support auto updater(and their slider templates.). 

If you need to use auto updater, you have to purchase slider's regular license separately. But as we mentioned. It's not necessary, you can still use slider that come with the theme like its' regular license and we still keep pushing slider's update in future theme's version as well ;)

6. Bad Authentication Data / Using twitter widget

If you see the message 'Bad Authentication Data', just don't be panic. It is because of you haven't filled all required data for twitter feed yet. You can easily disable this message by going to admin panel > overall elements > footer/copy right , then turn twitter feature off... But if you're using twitter feed, make sure that you follow these steps :)

Bad Authentication Data / Using twitter widget

1.) New twitter API requires you to setup the application before pulling the feed out. To achieve this, go to

https://dev.twitter.com/apps/

and logging in with your twitter account.

2.) Click create new application

3.) Click to create the access token, then refresh the page.

4.) Fill the data into the widget

5.) Put all info in admin panel 'overall elements > Footer/copyright'(Exist in some themes). And/or in Twitter widget setting.


7. Revolution Slider Activation Problem

Hi All,

There's actually not any problems about the slider at all. The version of slider that came with theme will NOT have purchase code for you to put in this field  http://take.ms/4qoqA ... and this isn't required so you can skip this step. You will still be able to use the slider properly. The difference when you put and not put the code is only you won't get auto updated + support from plugin author. (We purchased EXTENDED license from Resolution slider author and put in theme package as your bonus.)

The purchase code will be available only when you purchase regular license from Revolution Slider page directly  http://codecanyon.net/item/slider-revolution-respo...

But again, You can use this slider normally ;)

Hope this explains

8. How to Link donate now button with other page than donation form ?

it's super easy !  just edit your cause for which you want to give link on donate now button .

now enter your target link in donation form field of cause post like this : 

https://www.diigo.com/item/image/4hjpr/y7ku

now your donate now button will open http://www.example.com

instead of donation form !

9. Word cutting in middle on blog page

blog page will display number of words that you have set on blog item . but sometime defined limit can cut word in middle of whole word . so to overcome word cutting issue what you can do is change code to manage number of word instead of number of character for this . to do that add following code in your functions.php file (just before ending php tag ?> ) :

function word_count($string, $limit) {
        $words = explode(' ', $string);
        return implode(' ', array_slice($words, 0, $limit));
    }

now edit blog-item.php file (path is : wp-content/themes/themename/include/plugin/blog-item.php) andsearch file for following code : 

echo '
' . mb_substr( get_the_excerpt(), 0, $num_excerpt ) . '
';   

now replace that line with following code : 

echo '
' . word_count(get_the_excerpt(), $num_excerpt) . '
';

and save file .

now your blog page will display number of words instead of number of character that you have set in your blog item :)

10. Change order of personnel posts

you can sort personnel posts according to title , id , author , and all parameters listed here :

http://codex.wordpress.org/Class_Reference/WP_Quer...

edit this file :

wp-content/themes/modernize-v3-16/include/plugin/page-item.php:

at line number #100 you will see :

query_posts(array('post_type' => 'personnel', 'personnel-category'=>$category, 
       'posts_per_page'=> $num_fetch));

Change that to :

query_posts(array('post_type' => 'personnel', 'personnel-category'=>$category, 
       'posts_per_page'=> $num_fetch,'orderby'=>'title'));

in above code i have added title but you can add any parameter like author , id and others which is listed here http://codex.wordpress.org/Class_Reference/WP_Quer...

OR if you want to set manual order regardless of above parameter then don't add above code , just use following plugin :

https://wordpress.org/plugins/post-types-order/

That's all !


11. Exclude GoodLayers' GDPR Cookie from caching

The cookie of GoodLayers' GDPR named : gdlr-core-privacy-settings

Please make sure to exclude it if you're using caching plugin.

Ex. WP Fastest Cache


12. Can't upload logo

When you're having problem with uploading logo(or background), make sure that you click on 'File URL' button before insert it.

Hope this help!

13. Having problem with one click theme update(Envato Market Plugin)

Please try to follow these steps carefully. (Even you already have this key, We still suggest you to create a new one because sometimes Envato api has the problem with caching.)

1. Login to Envato with the account that purchased this theme and go to this url : https://build.envato.com/my-apps/

2. At the bottom, click 'Create a new token' 

3. Check on these settings: https://drive.google.com/file/d/14p-I2JljAjSwGsWo_LUU_nezw-eG1sru/view

4. Copy the code here and save it somewhere safe: https://drive.google.com/open?id=1hK0Ygzlb75yw2mIFe4NnHSVyVvTFkSTX and click on the confirm button.

5. Back to 'Envato Market' menu in your backend and put the code https://drive.google.com/open?id=1E9Nk8_06C5u3HsZHmTRCCsl1U3wt-1CE  and click on 'save changes'


14. Updating Layer Slider - Tourpackage since v2.00

Answer

1.) After you download theme package from Themeforest, Extract the package and go to folder 'THEMENAME-vx-xx'

2.) Go to the path, 'include/plugin/tgm-plugin-activation/plugins/layerslider.zip'

3.) Extract the file then copy the folder 'layerslider'

4.) Access to your site via FTP, to the path 'wp-content/plugins'

5.) Replace the existing folder in this path with the one you copied from 3.)

15. Max Mega Menu Integration

https://www.megamenu.com/documentation/tourpackage/

16. Updating Revolution Slider

1.) After you download theme package from Themeforest, Extract the package.

2.) Go to the path, 'GoodLayers Plugin' or 'Additional Plugins'

3.) Open the file 'Revolution Slider.txt' and use the link to download the latest version of Revolution Slider.

4.) Upload the new version of Revolution Slider that downloaded in 'Plugins' section

5.) Activate the plugin and clear browser's cache.

17. Bad Authentication Data / Using twitter widget - Grand College

Make sure that you're running theme version 1.09+ after that...

1.) You need to follow this first. > http://goodlayers.ticksy.com/faq/1895

2.) There will be a new used for shortcode below slider section.

[twitter width="590" user="goodlayers" consumer_key=" " consumer_secret=" " access_token=" " access_token_secret=" " ][/twitter]

18. Revoking the licenses

*Please note that one license is only valid for one website. When you revoke a license, it means you are discontinuing its use on your old website. Additionally, there is a maximum limit on the number of times you can revoke a license.

You can revoke your licenses by creating the account in our License Center : https://goodlayers.com/licenses/ 

After that, add a purchase code in the register box 

Then you will be able to revoke license(s) from there.

19. How to Change Portfolio title to link to specific URL , just same as Thumbnail image ?

just replace portfolio-item.php file with this one : Download

PATH IS : wp-content/themes/delicieux/include/plugin/portfolio-item.php:

Cheers !

20. Updating Good LMS

1. Go to Codecanyon, from your profile page and you will the tab 'Download'. You can download the latest version from there.

2. Unzip the package(All files package) and you will find the file "goodlms.zip".

3. Go to your wp dashboard > Plugins and deactivate Tour Master or Good LMS then remove the plugin. (Please note that if you customized the plugin's code, you have to do via FTP method to replace file by file. You can see changelog for modified files)

4. Install the plugin that you download and activate it.

5. Go to Setting > Permalink, switch permalink mode to the default one(the top one.) and then switch it back.

6. If the site doesn't work properly, clear browser's cache.

21. Making your site faster with WP Fastest Cache and Autoptimize

You can speed up your website by using the plugin 

WP Fastest Cache Plugin : https://wordpress.org/plugins/wp-fastest-cache/ 

Autoptimize : https://wordpress.org/plugins/autoptimize/

*Please note that with this method, it doesn't guarantee that you will get 100% of the score from speed tester. However, the score should improve a lot. The score will depend on image optimization too so you may seek for third party plugin to do image optimization but beware that it might drop your image quality, this is on your decision. And lastly, using CDN might improve your score too but you have to seek for third party service for this(You can check out CloudFlare free CDN service).

*Please also note that some third party plugins might not work with the minifying setting that we recommend so if it doesn't work, you may skip this setting. But it 100% works with the theme itself. 

Every time you made changes on your website, you should purge the cache too.

WP Fastest Cache

1. In Setting page, follow these settings.

2. Go to Exclude menu and add a new rule in Exclude Cookie section. 

Select Contain and fill 'Subscriber' in the field. (This to prevent caching when customers login. It will be useful in theme that require membership functionality such as Chariti, Travel Tour, Clever Course..)

Autoptimize

In the JS,CSS and HTML tab, follow these settings.


Using CDN?

If you're using CDN, we recommend to leaf the CDN field in Autoptimize empty go to use CDN setting in WP Fastest Cache instead.


22. Page Builder/Page Editor Broken

When editor or page-option is not showing.

It often cause of the corrupt media in media library.

You may fix this by accessing to the wp-config.php file using the hosting control panel / ftp editor program ( in the root folder where you install wordpress )

Then try adding this

define('WP_MAX_MEMORY_LIMIT', '1024M');

right after the php tag is opened ( <?php )

If it does not works, you have to remove it out instead.
You can see an example image of the corrupted media here.

*** Try removing only the blank media out ( You may have to remove it 2 – 3 times until it disappear ) ***

23. Modifying the enquiry form


Edit the files

1.) Go to include/tour-util.php file in tourmaster plugin folder
2.) Around line 1195, you'll see list of enquiry form fields.

$enquiry_fields = array( 
'full-name' => array( 
    'title' => esc_html__('Full Name', 'tourmaster'), 
    'type' => 'text', 
    'required' => true ), 
'email-address' => array( 
    'title' => esc_html__('Email Address', 'tourmaster'), 
    'type' => 'text', 
    'required' => true ), 
'your-enquiry' => array( 
    'title' => esc_html__('Your Enquiry', 'tourmaster'), 
    'type' => 'textarea', 
    'required' => true ),
);

3.) Try adding new field inside the array() as you want. 
4.) The structure will be ( select the "type" as "text" or "textarea" and select the "required" to "true" or "false" )

'FIELD_NAME' => array( 
    'title' => esc_html__('FIELD_TITLE', 'tourmaster'), 
    'type' => 'textarea/text',  
    'required' => true/false ),


Modifying the mail

1.) Go to "Tourmaster plugin option > General > Enquiry E-mail Content" section
2.) use {FIELD_NAME} to replace the word you want with the data user're filling.

Dear {full-name},
You have sumiited an enquiry from {tour-name}
Message: {your-enquiry}
Our team will contact you back via the email you provided, {email-address} 
Thank you!

24. How to choose a unique title background image for each page ?

You can add a 'upload' meta option in 'include/page-option.php' . Add the following code at line #1110

"Page background" => array(
  'title'=> __('Page Background', 'gdl_back_office'),
  'name'=>'post-option-package-background',
  'type'=>'upload'
),    

and then you can use the wp_head hook to output the style in the header. Add this code in functions.php at the end before the ?> .

// Add items to the header
function add_custom_style() {
$bg_meta = get_post_meta(get_the_ID(),'post-option-package-background', true);
    if($bg_meta ){
        $thumbnail = wp_get_attachment_image_src( $bg_meta , $item_size );
        echo '';
    }
}
add_filter('wp_head', 'add_custom_style');

You should now see an option for the background-image in the 'Page Options'


25. How to get instagram Access Token

1.) Go to this url and click "Register Application" 

https://www.instagram.com/developer/

2.) Click "Register a New Client" button

3.) At the details section, fill the Application Name / Website URL / Valid redirect URIs and Contact email

4.) On security tab, deselect the "Disable implicit OAuth" option and click register

5.) Open this link after you replace the "CLIENT_ID" and "REDIRECT_URL" with the one you registered and click "Authorize" button

https://api.instagram.com/oauth/authorize/?client_id=CLIENT_ID&redirect_uri=REDIRECT_URL&response_type=token&scope=public_content

6.) After clicking the authorize button, your browser will be redirect to the url with access token.

http://localhost/xampp/splash.php#access_token=xxxxxxxxxxxxxxxxxxxxxxxxxxxx

You can copy your access token out to be used in the instagram widget.

---------------------------------------------------------------------------------------------

Ref. https://www.instagram.com/developer/authentication/

26. Can not see theme in the list when submitting new ticket?

Some customers experience the problem when trying to submit a ticket to the new theme, the theme won't show up in the 'Product or Category' list :  


To fix this,

1. Click on this button to reconnect your Envato account : 


2. If still doesn't help, try to logout from the support site, clear your browser cache and then login to support site with Envato account again.


3. *If possible, you may try on different browser as well.


27. Blog Widget Equal Height - Modernize

Going to footer.php file.

at the bottom, try adding this right before the end of the body tag ( </body> ).

<script type="text/javascript">
jQuery(window).load(function(){
jQuery('.blog-item-holder').each(function(){
var max_height = 0;
jQuery(this).children('.blog-item0').each(function(){
if( jQuery(this).height() > max_height ) max_height = jQuery(this).height();
});
jQuery(this).children('.blog-item0').height(max_height);
});
});
</script>

28. Updating Layer Slider

1. Download the slider via the link provided from us.

2. Go to Plugins > Add New and upload the new file.

3. Click on Replace button.

*In case of things may go wrong, we suggest you to backup the old version of slider first. You may rename the old Layerslider folder to 'Layerslider_old' or you can download to keep in your local computer.

29. Can't import demo content

Because the different in each hosting environment cause the problem with import demo content so sometime it can’t work as it should and it not import all demo images for you. So we have other way by use duplicator package to install our demo site. Please follow our step to install duplicator package in your site.

Step 1: https://photos.app.goo.gl/uKt5aTyFzm6cviQcA

Step 2: https://photos.app.goo.gl/B5GxCBr1f5bDwDiV8

Step 3: https://photos.app.goo.gl/xm5o9YMjLdmr7U7B9

For extraction way, you can check more in here:
+ https://snapcreek.com/duplicator/docs/faqs-tech/#faq-trouble-060-q

+ https://snapcreek.com/duplicator/docs/faqs-tech/?load#faq-installer-015-q


Step 4: https://photos.app.goo.gl/JE4vhfxroMpXmvZq6

Step 5: https://photos.app.goo.gl/m6VCMRg8EWpjw5Qv5

Step 6: https://photos.app.goo.gl/up2TAhLPYfwp81EU8

Step 7: https://photos.app.goo.gl/sfVb15Lx2W2cryGQ7

Step 8: https://photos.app.goo.gl/g9znQRZw2rk3EJj29

Please note: The duplicator package will work with outdated version. After your installation, you must
update theme/plugin to latest version to make sure it’s work well as it should. Please update your site
with our instruction below:


To Update Theme : https://goodlayers.ticksy.com/article/1893/  (Please make sure to update GoodLayers' plugins as well.)

30. How To Update GoodLayers Plugins? (since Flawless Theme)

First of all, please note that you can't use this method with Layer Slider, Revolution Slider and Master Slider.

1.) Go to 'Appearance > plugin', deactivate Goodlayers plugins and delete them. 

2.) After you delete them, you'll see the message :

Click on 'Begins installing plugins'

3.) Install them and don't forget to activate too! 


31. Making your site faster with W3 Total Cache plugin

You can speed up your website by using the plugin "W3 Total Cache" https://wordpress.org/plugins/w3-total-cache/

*Please note that with this method, it doesn't guarantee that you will get 100% of the score from speed tester. However, the score should improve a lot. The score will depend on image optimization too so you may seek for third party plugin to do image optimization but beware that it might drop your image quality, this is on your decision. And lastly, using CDN might improve your score too but you have to seek for third party service for this. Normally, this is not a free service.

*Please also note that some third party plugins might not work with the minifying setting that we recommend so if it doesn't work, you may skip this setting. But it 100% works with the theme itself. 

Every time you made changes on your website, you should purge the cache too.

Here are the recommend setting from us. 

1. General Setting.


2. Page Cache 

3. Minify


4. Browser Cache

32. Updating Tour Master

1. Go to Codecanyon, from your profile page and you will the tab 'Download'. You can download the latest version from there.

2. Unzip the package(All files package) and you will find the file "tourmaster.zip".

3. Go to your wp dashboard > Plugins > Upload. (Please note that if you customized the plugin's code, you have to do via FTP method to replace file by file. You can see changelog for modified files)

4. Upload the plugin that you download, click to replace the old files and activate it.

5. Go to Setting > Permalink, switch permalink mode to the default one(the top one.) and then switch it back.

6. If the site doesn't work properly, clear browser's cache.

33. Add comment to course page.

1.)

go to include/course-option.php file in goodlayers-lms plugin folder, at line 37, change

'supports'           => array( 'title', 'editor', 'author', 'thumbnail', 'custom-fields', 'revisions' )

to

'supports'           => array( 'title', 'editor', 'author', 'thumbnail', 'custom-fields', 'revisions', 'comments' )

2.)

in single-course.php file around line 117, add this

comments_template( '', true ); 

right after

echo '</div>'; // course-content

3.) 

Try editing the course you want to enable the comment, and select "allow comments" in "discussion tab" 

( If the discussion tab is not showing up, you may check the screen option area for this. http://www.wpbeginner.com/glossary/screen-options/ )

34. Fixing / Using Twitter Widget - (Themes before Modernize)

Updated : 17/6/2013

----------> Updating twitter widget

----------> Using twitter widget

Updating twitter widget (For theme version that didn't include this yet. If your current version already have this fix, skip to next section)

1.) Go to functions.php file, place this code at the bottom ( right before the ?> sign )

    include_once('include/functions/custom-widgets/twitteroauth.php');


2.) Download these two files ( twitter-widget.php and twitteroauth.php ) from here : http://take.ms/gkVWS (unzip first) and place it in include/functions/custom-widgets folder ( using the ftp-editor or hosting control panel program )

Using twitter widget

1.) New twitter API requires you to setup the application before pulling the feed out. To achieve this, go to

https://dev.twitter.com/apps/

and logging in with your twitter account.

2.) Click create new application

3.) Click to create the access token, then refresh the page.

4.) Fill the data into the widget

35. To Update Theme

* Please make sure that you haven't changed or customize any theme code directly. otherwise, you have to do it again.

To update the theme,

Make sure that you backup your current theme files if it has been modified (if it's not, you can ignore this), you can download it and keep locally via FTP method. It's in the path 'wp-content/themes/THEMENAME'

There are two methods for updating the theme.

1. Using one click updater via Envato Market pluginhttps://envato.com/market-plugin/ Please follow the guideline from the plugin but if you are getting the problem please try to follow our guideline here : https://goodlayers.ticksy.com/article/10957/ 

2. Manual method... In case that the auto update doesn't work or you don't want to install the Envato Market plugin, we suggest the manual method. 

You need to login to your Themeforest profile page, click on 'download' tab, then download the theme again.

After that,

2.1.) After you downloaded file from Themeforest. Do not upload it yet. Extract it!

2.2.) You will find 6-7 folders and some files inside. You'll see the file called 'THEMENAME.zip'

2.3.) Go to 'Appearance > themes' and click 'Add new' button. 

2.4.) Upload 'THEMENAME.zip' that you just downloaded from Themeforest through wp backend, click to override the old one and activate the theme.

2.5.) Go to 'appearance > menu' and assign menu to themes location again.

2.6.) Go to Theme option and click 'save changes'.

After you update the theme, please make sure to update the plugins that come with the theme as well. You can follow the instruction below.

To update plugin that comes with our theme.

1.) Make sure that you register the purchase code to your website first (this applies with themes since Infinite) : 


2.) Go to 'GoodLayers > Install Plugins' and you will be able to update plugins from there . (For Revolution Slider, Layer Slider and Maser Slider, we suggest you to back up slider by exporting the slider content first.)

2.) Go to 'Appearance > Install Plugins' section then, install the plugin you want.

3.) Activate the plugin.

*** For 'goodlayers lms' plugin, you have to save the LMS Option once after the plugin is activated as well.


After updating

1.) Make sure that you clear browser's cache as well.

2.) Go to admin panel(theme options) and click 'save changes' once.

3.) If you get 404 error on single post(for any post type), go to permalink, set to default one and then set back to the one you used.

36. Adding Instagram icon in the header (Themes in second framework version.)

To add instagram social icon in header, please follow our steps below:

+ First, please download custom file below:

https://drive.google.com/drive/folders/0B_H4npZEAp4_RTNzdVVTTkRybVU?usp=sharing

+ Upload both image in:

+ wp-content/themes/THEMENAME/images/dark/social-icon
+ wp-content/themes/THEMENAME/images/light/social-icon
+ Then replace gdlr-social-icon.php file in: wp-content/themes/THEMENAME/include/gdlr-social-icon.php

+ Check theme option and fill instagram link now.

+ Then check your website.

37. Security Concern

Here at GoodLayers, we take it really serious about security issue. So, before we launch every of our themes, we will make sure that it will not have any vulnerabilities. 

1. When we create themes, we do not create any custom functions to communicate with database. We only use it via WordPress's function only so at this point, it will be on the WordPresss itself.

2. The vulnerabilities can caused by third party unreliable script that contact to third party url. In this case, we only use the script that contact to Google(to pull Google font) and Google is surely reliable source.

3. Before launching the theme, Envato will perform the theme reviewing including the checking of inappropriate coding. So they will ensure that all themes sold on the market place will be coded by following the best practice of WordPress theme creation and also they will reject the theme if the code include such a vulnerability.

However, these are possibilities of the infection.

1. Using share hosting, share hosting (or maybe bad hosting) can caused such an issue. When other customer's site that is on the same hosting(shared) of yours get infected, your site will have a high risk then. We can confirm this by our experienceI. We used to use some cheap local hosting and it was not quite good. Some customers' sites got infected and my site was infected too. After cleaning viruses, it didn't go away but after we switched hosting(We switched to Media Temple at that time.), the problem was completely cleared.

2. Vulnerabilities in third party plugins. This is one of the most popular reason that cause WordPress site's infection. Make sure that you use the plugins that are well implement with best practice of WP plugins creation and notice that the plugins are updated from time to time to ensure that they keep fixing bugs and patch vulnerabilities.(We do this with our products all the time.)

3. Bad permission folder setting on your server. Make sure that it's securely set. 644 is recommended for php files and 755 is recommended for the folder. By missing the good setting can let hackers to edit files.

4. Password leaks. Make sure that you set the very strong password for admin role, CPanel, Database password, etc…

There can be other reasons for these but it will be good to have these things checked. 

There're also some tips from us.

1. You can try using security wp plugin : https://kinsta.com/blog/wordpress-security-plugins/

2. It will be much even better if you use DNS with security feature. You may check out CloudFlare service. It's quite useful. 

38. Full Width Logo in in V3.0+ - Modernize

In this version you can just upload the full size(980px width) of logo in logo upload box in admin panel directly.

But just add this code

div.header-wrapper {
margin: 0px !important;
}
div.outer-social-wrapper {
position: absolute;
top: 20px;
right: 20px;
}

in custom css box in admin panel too > http://d.pr/i/Ld67

And also make sure that you change logo margin top/bottom to '0' > http://d.pr/i/pqpv

And if you see extra space between logo and main navigation, Try to add this code too.

div.logo-wrapper {
line-height: 0px; 
}
div.navigation-wrapper {
margin-top: -2px;
}

39. Creating Child Theme

To create child theme

If you don't want to modify the theme files everytime you update the theme, you have to create the child theme to modify the php code for this. You can find the tutorial about how to create the child theme here


Our theme wrap every function with if( !function_exists('some_function') ) command, so if you want to use any function, just declare it in the function.php file of the child theme and it'll overwrite the existing one.

40. Adding social shares in pages - Modernize

Go to page.php on line about 184-185 and put this code

echo "<div class="social-share-title gdl-link-title gdl-title" style="margin-left: 10px; margin-top: 40px;">";
echo "<h3>Social Shares</h3>";
include_social_shares();
echo "</div>";
echo "<div class="clear"></div>";

So you'll see this.

41. Creating Woocommerce Template For WooCommerce's Sidebar

http://wcdocs.woothemes.com/codex/third-party-cust...

On the most part, WooCommerce templates will integrate nicely with most WordPress themes. Where you may run into problems is when the default WooCommerce content wrappers do not match your chosen theme's. This will manifest itself by breaking your layout on WooCommerce pages and shifting your sidebars into incorrect positions.

This problem can potentially affect the shop page, the single product page and the taxonomy pages (categories and tags) because WooCommerce uses templates of its own to display these pages (and its impossible for WooCommerce to know exactly what markup your theme uses). Other pages (checkout, cart, account) are not affected because they use your theme's page.php template.

To create the woo template file.

1.) Copy the page.php file and rename it to woocommerce.php file ( DO NOT remove the page.php file out )

2.) Try finding this in the woocommerce.php file.

while (have_posts()){
the_post();
....

....
}

and replace it with

woocommerce_content();

To create the sidebar on woocommerce.php file.

1.) Try finding this at the top of the page.

$sidebar = get_post_meta($post->ID, 'page-option-sidebar-template' ,true);

and change it to

$sidebar = 'right-sidebar'; // left-sidebar, both-sidebar or no-sidebar

2.) Try finding this

$left_sidebar = get_post_meta( $post->ID , 'page-option-choose-left-sidebar', true);
$right_sidebar = get_post_meta( $post->ID , 'page-option-choose-right-sidebar', true);

and change it to

$left_sidebar = 'NAME_OF_THE_SIDEBAR_YOU_CREATE_IN_ADMIN_PANEL';
$right_sidebar = 'NAME_OF_THE_SIDEBAR_YOU_CREATE_IN_ADMIN_PANEL';

42. Larger Lightbox(PrettyPhoto) in mobile/tablet

Try to put this code in additional css in admin panel or at the end of style.css

@media only screen and (min-width: 480px) and (max-width: 767px) {
	 .pp_pic_holder{ left: 50% !important; width: 400px !important;  margin-left: -200px !important; }
	 div.pp_default .pp_content_container .pp_right{ padding-right: 21px !important; }
	 .pp_content, #pp_full_res img{ width: 100% !important; height: 100% !important; }
	 div.pp_default .pp_content_container .pp_details {margin-top: 20px !important; }
}

@media only screen and (max-width: 479px) {
	 .pp_pic_holder{ left: 50% !important; width: 300px !important;  margin-left: -150px !important; }
	 div.pp_default .pp_content_container .pp_right{ padding-right: 21px !important; }
	 .pp_content, #pp_full_res img{ width: 100% !important; height: 100% !important; }
	 div.pp_default .pp_content_container .pp_details {margin-top: 20px !important; }
}

Hope this help :) 

43. Where can I get my purchase code?

Where can I get my purchase code?

If you're submitting ticket without using Envato login, you will need purchase code instead. Purchase code can be obtained in your Themeforest profile page, click on the tab "Download", from the item list, click on the button "Download" of the item and you will see where to get the code. See this 


44. How to change the donation values in Donate Now popup box?

you can change values either globally or in individual cause :)

1 : for global :

go to WP-admin-panel > charity hub > cause style and in donation form field you can specify values like this :

[gdlr_paypal user="[email protected]" val_1="100" ,  val_2="75" ,  val_3="50"]

2 : to change values in individual cause : edit your cause and do same as above in cause's donation form field .

Cheers !

45. Updating Master Slider

1.) After you download theme package from Themeforest, Extract the package.

2.) Go to the path, 'Master Slider' or 'GoodLayers Plugin' 

3.) Open the file 'Master Slider.txt' and use the link to download the latest version of Master Slider.

4.) Deactivate Master Slider plugin and remove it. *Before Deactivating, you may export Master Slider data for back up first.

5.) Upload the new version of Master Slider that downloaded.

6.) Activate the plugin and clear browser's cache.

46. How to upload the theme via FTP method

To upload the theme via FTP method, make sure that you have the access detail such as hosting, username and password. (If you don't know how to get these info, you can ask your host provider.)

1.) Download the 'installable file' of the theme from Themeforest and you will see the file called "THEMENAME.ZIP" or "THEMENAME-vx-xx.zip".

If you download the full package, unzip the package first and you will see the file called "THEMENAME.ZIP" or "THEMENAME-vx-xx.zip"

2.) Access FTP via FTP client. We suggest FileZilla for this(free software). 

3.) Fill access info and login to the path of "wp-content/themes"

4.) Upload the file from instruction 1.) in the path in instruction 3.)


47. How can I change the font size on the menu ?

add this code at WP-admin-panel > theme options > additional css box :

ul.sf-menu li.menu-item a{
font-size:20px;
}
ul.sub-menu li.menu-item a{
font-size:10px;
}

here 20 is the main navigation font size and 10 is for sub menu font size :)

and save changes ,


48. TourPackage Theme - Creating 'Boxed Layout'!

Try to add this css in additional stylesheet in admin panel.

div.body-wrapper {
width: 1020px;
margin: auto;
background: #FFF;
}
body {
background: #555; 
/* background: url('IMG_URL'); */
}

Hope this help :)

49. Translating the theme/plugin using poedit application

You can download the application here http://poedit.net/

50. How to change currency in donation box ?

it might be possible that you want to use some other currency for donation on your site like euro , pound , Australian dollar etc .

to change the currency : add currency_code="AUD" in paypal shortcode at WP-admin-panel > charity hub > cause style > donation format .

like this :

[gdlr_paypal user="[email protected]" action='https://www.sandbox.paypal.com/cgi-bin/webscr' currency_code="AUD" ]

AUD is for Australian dollar , you can change it as per your requirements .also change $ in money format field with symbol of your currency and save changes .

****** some general code *****

euro : EUR 

british pound : GBP

Canadian Dollar : CAD 

all codes hete : http://www.xe.com/iso4217.php

51. where i change the value of points compiled for a win for the league table ?

in include/league-table-item.php file, around line 76, try changing 

$league_table[get_the_title()]['pts'] = ($league_table[get_the_title()]['overall-win'] * 3) + $league_table[get_the_title()]['overall-draw'];

to :

$league_table[get_the_title()]['pts'] = ($league_table[get_the_title()]['overall-win'] * 2) + $league_table[get_the_title()]['overall-draw'];

and save file .  in above code 2 is just example . change it as per need .

52. Updating POT file

Sometimes, our theme/plugin will update and it will contain new string, so these translation files in older version will not work. Please try follow our instruction below to update these translation files to make it work in new version and update new string.

Step 1: Please backup all translation files first before do anything.

Step 2: https://photos.app.goo.gl/vEBRd8nULbZT4CFZA


Step 3: https://photos.app.goo.gl/ZeQk3oZK84KrB7KT8


Step 4: Upload these translation files and check it again.


53. Server Configuration Requirements

Below is the list of main server setting parameters and the recommended values. If you can't change it by yourself, you must contact your host provider to do it.

post_max_size: Sets max size of post data allowed. 

post_max_size = 25M 

upload_max_filesize: Sets the maximum size of an uploaded file.

upload_max_filesize = 40M 

max_input_time: Sets the maximum time in seconds a script is allowed to parse input data, like POST and GET 

max_input_time = 300 

max_execution_time: Sets the maximum time in seconds a script is allowed to run before it is terminated by the parser. 

max_execution_time = 300

memory_limit: Sets the maximum amount of memory in bytes that a script is allowed to allocate 

memory_limit = 256M 

max_input_vars: Sets the number of input variables may be accepted 

max_input_vars = 4000

If suhosin patch is installed, change the following parameters to the specified values.

php_value suhosin.post.max_array_depth 100 

php_value suhosin.post.max_array_index_length 128 

php_value suhosin.post.max_name_length 128 

php_value suhosin.post.max_totalname_length 512 

php_value suhosin.post.max_value_length 2000000 

php_value suhosin.post.max_vars 5000 

php_value suhosin.request.max_array_depth 100 

php_value suhosin.request.max_array_index_length 128 

php_value suhosin.request.max_name_length 128 

php_value suhosin.request.max_totalname_length 512 

php_value suhosin.request.max_value_length 2000000 

php_value suhosin.request.max_vars 5000


*Your site might not really consume these values but what we recommended is just to make sure that although your site is large, the setting up process will get smooth. You may try to decrease some value if you feel it's too big or you can decrease values after you finish setting up website.